Many people make this casserole at holidays or when someone has a baby. This recipe freezes beautifully. You will seldom find this recipe without condensed soups, but it is very simple to make gluten-free. All you need is a little rice flour to make a roux and you are set!

CHICKEN BROCCOLI CHEESE CASSEROLE
1 lb cooked chicken, shredded Note: if you don’t have any cooked chicken on hand it is very simple to poach chicken breasts. Place the chicken in a large skillet with about 2 cups of water. Bring to boiling; reduce heat. Simmer, covered, for 12-14 minutes or until chicken is no longer pink (170 degrees). Drain well. Shred chicken.
1 cup cooked brown rice (cooking the rice in gluten free chicken broth works nicely)
1 lb fresh broccoli, chopped
2 Tablespoons of butter
2 Tablespoons of rice flour
1/2 teaspoon salt
1/4 teaspoon of pepper
1/2 teaspoon of dried mustard
1 1/2 cups of milk
squeeze of lemon juice (optional)
1 Tablespoon of mayonnaise (optional)
1 1/2 cups of cheddar cheese, shredded
1/2 cup gluten-free bread crumbs for topping
1/4 slivered almonds for topping
Directions:
Melt the butter in a medium saucepan. Add the flour, salt, pepper, and mustard, and cook 2-3 minutes until bubbly and foamy. Slowly whisk in the milk and cook until thickened. Stir in the shredded cheese. Place the brown rice, chicken, and broccoli in a casserole dish and pour the white sauce over the top. Add the mayonnaise and lemon juice if using and mix until combined. Spread the breadcrumbs and slivered almonds over the top. Bake uncovered for about 30 minutes at 350 degrees.
If you liked this post, please Stumble it! or Add to Del.icio.us.
Posted by Natalie
Filed under: Casserole, Celiac, Gluten Free, Holidays, Poultry | 26 Comments »
Ellen, over at I Am Gluten Free, inspired me to make a more fantastic breakfast. Muffins, fantastic? These days muffins are definitely fantastic. I have always loved breakfast, but breakfast time has gotten a little more desperate and a lot more boring. For some reason, being pregnant and gluten-free is harder in the wee hours of morning when my toddler is begging to be put in the highchair. My new strategy for being a more prepared mother and gluten-free cook is this: cook when I feel like cooking. The cook when I am starving or tired method does not work and unfortunately, these are the normal times to cook. So I am making muffins at ten o’clock at night for tomorrow’s breakfast. And I just might make dinner at three tomorrow afternoon!
My muffins turned out great- I am really loving sorghum flour. If you don’t want to do a struesel topping, these will taste great plain. My recipe is an adaptation of a Martha Stewart recipe found here. I made the recipe gluten-free, changed proportions only slightly, and added zucchini. The streusel topping I found at I Am Gluten Free. To get the recipe for the streusel, go visit Ellen!
Note: These would be great for a Mother’s Day Brunch as Martha suggested!

CARROT ZUCCHINI MUFFINS
2/3 cup sorghum flour
2/3 cup tapioca flour
2/3 cup white rice flour
3/4 cup of granulated sugar
3/4 teaspoon xanthan gum
2 teaspoons of baking powder
3/4 teaspoon of baking soda
2 teaspoons pumpkin pie spice
1/2 teaspoon salt
1 cup plain low-fat yogurt
1 large egg
5 tablespoons of melted butter
2 1/2 cups carrot and zucchini, grated or shredded
Directions:
Preheat the oven to 375 degrees. Prepare the muffin tins with liners or grease them really well. Whisk the dry ingredients together well in a large bowl. In a med. bowl, combine the egg, yogurt, and melted butter. Make a hole in the dry ingredients and pour in the wet ingredients; stir until combined. Add the grated zucchini and carrot. Spoon the batter into muffin cups. Top with streusel if using. Bake for about 20-25 minutes- it may take a little longer in some ovens, but overdone gluten-free muffins are terrible-keep an eye on them!
Makes about 18 muffins.
If you liked this post, please Stumble it! or Add to Del.icio.us.
Posted by Natalie
Filed under: Baked Goods, Breakfast, Gluten Free, Muffins | 16 Comments »
This easy recipe for chicken pot pie has just a top crust. I used cornmeal and honey in the topping for an old-fashioned taste. The vegetables I used are just a guideline- experiment with what you have left at the end of the week. I missed this comfort food because it is a great way to use leftover vegetables and chicken. The freshness of this dish will make you forget about those chalky-tasting, frozen chicken pot pies.

EASY CHICKEN POT PIE
1 lb chicken breast, cooked and shredded
2 Tablespoons of rice flour
2 Tablespoons of olive oil
1/2 teaspoon dried mustard
1/2 teaspoon salt
1/4 teaspoon pepper
5 carrots, sliced/diced thin
1 can quartered artichokes
1/2 of a large red bell pepper
1 pkg of sliced mushrooms
3/4 cup of sweet peas
1/2 cup boiling onions or regular onions, diced
1 3/4 cup of chicken stock (homemade or gf brand)
1 Tablespoon fresh basil, chopped finely
3 Tablespoons of sour cream
1 clove garlic, minced
Topping
1/2 cup of cornmeal
1/4 white rice flour plus 2 Tablespoons
2 Tablespoons of tapioca flour
3/4 teaspoon of xanthan gum
1 1/2 teaspoons of baking powder
1/2 teaspoon of salt
1 Tablespoon honey
3/4 cup of milk
2 Tablespoons of olive oil
Directions:
Chop/dice/thaw the vegetables for the chicken pot pie. To prepare the boiling onions, boil them for 2 minutes and then immerse them in cold water. Cut off the ends of each onion, slip off the skin, and cut a shallow ‘x’ on the bottom.
In a Dutch oven, heat 2 Tablespoons of olive oil over medium heat. Add the 2 Tablespoons of rice flour, 1/2 teaspoon of dried mustard, 1/2 teaspoon of salt, and 1/4 teaspoon of pepper. Cook about 2-3 minutes until bubbly and foamy. Slowly whisk in the chicken stock. Return to boiling. Add the vegetables and basil and simmer for ten to twelve minutes or until tender. Add the cooked chicken and the sour cream; combine well. Put the vegetable mixture in a 9×13 baking dish.
Preheat oven to 425 degrees.
To prepare the topping, combine the dry ingredients in a small bowl and whisk together well. In a large bowl, combine the honey, milk, and olive oil. Add the dry ingredients and stir until moistened. Spread on top of the vegetable mixture.
Bake, uncovered, about 30 minutes or until lightly browned. Let stand for 15 minutes before serving.
Serves about 6
If you liked this post, please Stumble it! or Add to Del.icio.us.
Posted by Natalie
Filed under: Casserole, Celiac, Dinner, Easy, Egg-free, Gluten Free, Poultry | 15 Comments »
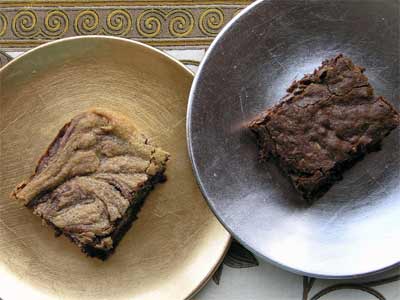
Afraid of failure and completely unable to decide which brownie recipe I wanted- I made two batches! Both turned out great (funny how that works), so I am posting both recipes. You decide which brownie you are in the mood for or make both!

Brownie Companions
ORANGE ALMOND BROWNIES
3/4 cup almonds, ground coarsely
3 oz. unsweetened chocolate, chopped
6 tablespoons of butter
2 eggs
1 cup granulated sugar
1 Tablespoon orange zest
3/4 teaspoon vanilla
pinch of salt
1/4 cup rice flour
1/4 teaspoon xanthan gum

ORANGE ALMOND BROWNIE
Directions:
Preheat the oven to 350 degrees. Butter an 8 inch square baking pan. Combine the chopped unsweetened chocolate and the butter in a med. saucepan and cook over very low heat; stir until smooth. Remove from heat and set aside.
In a large bowl, whisk the eggs until foamy. Whisk in the sugar, zest, vanilla, and salt until combined. In a separate small bowl, whisk the xanthan gum and rice flour together. Stir the melted chocolate into the large bowl with the egg/sugar mixture. Add the flour mixture and mix until just blended. Fold in the coarsely ground almonds. (I ground my almonds in a mini-food processor, but did not grind them into a fine meal because I wanted a crunch to my brownie- either way is fine)
Put the batter in the greased baking dish and cook for about 30 minutes. Let cool.
Makes about 9 big squares.
If you liked this post, please Stumble it! or Add to Del.icio.us.
Posted by Natalie
Filed under: Baked Goods, Celiac, Desserts, Gluten Free, Holidays | 7 Comments »
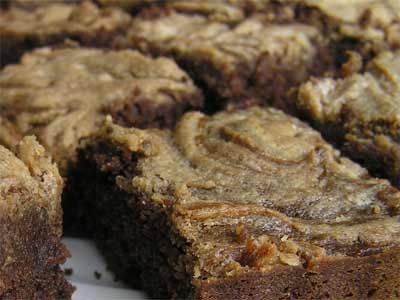
My chocolate cake was gone, and the urge to bake hit me again. This time I decided to make tons of brownies so that I could freeze some for after the new baby comes. I adapted the first brownie recipe from my Colorado Collage cookbook. The ingredient that makes these brownies so special is the cinnamon!

CHOCOLATE PEANUT BUTTER BROWNIES
1/4 cup sorghum flour
1/4 cup tapioca flour
1/2 cup rice flour, plus one tablespoon reserved
1/4 teaspoon baking powder
1/4 teaspoon xanthan gum
1/2 teaspoon salt
3/4 cup butter (1.5 sticks)
3 oz. unsweetened chocolate, finely chopped
3 eggs
1 1/3 cups brown sugar firmly packed
1 1/2 teaspoons vanilla
3/4 cup creamy peanut butter
1/4 cup granulated sugar
1/4 teaspoon cinnamon
6 tablespoons whipping cream (orig. recipe called for half-and-half, use what you have!)

Directions:
Preheat the oven to 350 degrees. Butter a 9x13x2 baking dish. In a small bowl, sift the flours together well. Add the xanthan gum, baking powder, and salt and whisk well. In a med. saucepan, melt butter and chopped unsweetened chocolate over very low heat, stirring until smooth. Remove from heat. In a large bowl, whisk together the eggs, brown sugar, and vanilla. Stir in the melted chocolate. Gradually add the flour mixture until combined. Pour into a greased 9x13x2 pan.
In your stand mixer (or with an electric mixer), combine the peanut butter, sugar, cinnamon, whipping cream, and remaining tablespoon of rice flour. Drop the mixture by spoonfuls on top of the brownie mixture. Using a knife, drag the peanut butter mixture over the surface to marbleize brownies. Bake for 25 minutes. Cool before cutting!
Makes about 24 brownies. I would suggest freezing some!
If you liked this post, please Stumble it! or Add to Del.icio.us.
Posted by Natalie
Filed under: Baked Goods, Celiac, Chocolate, Desserts, Gluten Free, Holidays | 8 Comments »


 I am
I am  I am
I am  I am
I am